Support Electronic Referral Loops by Receiving and Incorporating Health Information
Click the following dropdowns to see what's changed for this measure.
The following table includes this measure's changes for 2020.
| Measure Changes for 2020 | |
|---|---|
| Name Changes | None |
| Measure Changes |
None |
| Workflow Changes |
None |
The following table includes what changed for this measure in 2019.
| Measure Changes in 2019 | |
|---|---|
| Name Changes |
The Request/Accept Summary of Care and Clinical Information Reconciliation measures have been replaced by the Support Electronic Referral Loops by Receiving and Incorporating Health Information measure. |
| Measure Changes |
This documentation has been modified to reflect that the numerator and denominator count summary of care documents, rather than visits. |
| Workflow Changes |
Importing the Electronic Summary of Care Document Previously, the practice could save the CCDA document as a Clinical Document, which had to be linked to the qualifying visit. For 2019, you must save the CCDA document as a Reference Document. Reference Documents do not need to be linked to a visit when they are saved. You must, however, link the document to a visit when acknowledging it or automatically reconciling data. Also, you can no longer select the Outside Summary of Care Available check box; you must import a CCDA document. |
|
Reconciling Data Manually from the Facesheet You must link the visit before starting the reconciliation. You must also link the document to a visit when reconciling the data. After you manually reconcile using the History & Habits Wizard or Medications List, rather than a Note, you must create or edit the visit's Note. Then, you must load the PFSH, Assessment, and Plan sections to record the reconciliations in the Note. |
|
|
Reconciling Data Automatically by Importing In the Clinical Reconciliation window, you must select at least one item under Demographics, along with any items from the Allergy, Medications, and Problem List sections, before selecting the Import button. |
|
|
Selecting Inbound Transfer/Referral in Multiple Notes Previously, when providers selected the Inbound Transfer/Referral check box in the Plan section in multiple notes linked to the visit, they received credit for each. In 2019, credit is only given once per summary of care document. |
|
Measure Overview
This measure reports the number of summary of care documents linked to visits in which a patient is seen for the first time, referred into the practice, or is an existing patient who already has a summary of care document saved to their chart, and the provider performs a clinical information reconciliation using information from the electronic summary of care document, including the following three clinical information sets: Medication, Medication Allergy, and Current Problem list.
| Measure Overview | |
|---|---|
| Denominator |
The number of electronic summary of care documents linked to a visit where the EP was the recipient of the transition or referral OR the EP has never before encountered the patient. If there are 3 electronic CCDs available for the patient, all 3 count in the denominator. |
| Numerator | The number of electronic summary of care documents where the provider performed a clinical reconciliation of medications, medication allergies, and current problems. |
| Medicare Goal |
At least 1 electronic Summary of Care received, incorporated, and reconciled |
See the following sections for more information about the Support Electronic Referral Loops by Receiving and Incorporating Health Information measure:
Denominator Criteria
Summary of care documents linked to a visit qualify for the denominator if the visit involves a new patient or a patient who had a transition of patient care. This transition of patient care can be a referral into the practice or an internal referral.
Electronic Summary of Care Documents qualify if both of the following are met:
| 1. | The patient must have a visit during the performance period. This visit must be a referral into the practice or the patient’s first time seeing the provider which can be indicated by either of the following: |
- The Plan or E&M section of the Note includes a new patient E&M code for the patient. New patient E&M codes include codes in the range of 99201-99205 or 99381-99387. The E&M code must be added at the same time or after the start of the visit.
- The Inbound Referral/Transition check box is selected under Referrals in the Plan section of the Note. This must be selected at the same time or after the start of the visit.
| 2. | An electronic summary of care document (also known as a CCD or continuity of care document) must be imported into the Reference Documents section on the patient’s Facesheet. The import date for this document can be any time before the end of the visit, even before the start of the measurement year. The document must be linked to the visit. |
To manually reconcile data by reviewing a CCDA that is saved to the Reference Documents section of a patient’s chart., the visit must be linked to the patient's chart and the provider (logged onto Prime Suite as himself or herself) must be the user that selects the Acknowledge button on the Reference Document. With the visit still linked, the Clinical Reconciliation boxes must be checked in the note.

The denominator criteria must be met during the performance period set in Prime Suite Reporting 2020.
Numerator Criteria
Electronic summary of care documents that qualified for the denominator are counted in the numerator if each of the following reconciliations are completed during the same visit:
- Medications: Review of the patient’s medications, including the name, dosage, frequency, and route of each medication. In the event of an audit, it is the site’s responsibility to ensure this information is documented for the patient’s outside medications.
- Medication Allergies: Review of the patient’s allergies for known medication allergies.
- Current Problems: Review of the patient’s problems for current and active diagnoses.
To qualify an electronic summary of care document for the numerator:
- The Medications, Medication Allergies, and Current Problems reconciliations must be performed during the same visit, which must be the patient’s first visit.
- The patient’s visit must occur during the performance period.
- The reconciliations must occur during or after the visit has been checked-in and linked.
- The documentation of these reconciliations must occur during a face-to-face visit.
Setup Requirements
See the following sections for this measure's setup requirements:
- Setting the Reconcile Reference Documents User Right
- Adding the Reference Documents Section to the Facesheet
- Configuring the Method by Which Your Organization Will Import CCDs
Setting the Reconcile Reference Documents User Right
Users must have the Reconcile Reference Documents user right assigned before they can automatically reconcile CCDAs. To grant users this permission, follow these steps:
| 1. | Select System > User Rights. The User Rights window opens. |
| 2. | Select System under Modules on the left-hand side. |
| 3. | Select Reference Documents under System Categories. |
| 4. | Select the check box for Reconcile Reference Documents. |
| 5. | Select Save under Category Actions on the left-hand side to save your changes. |
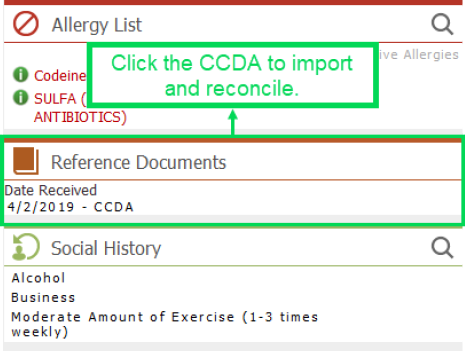
Adding the Reference Documents Section to the Facesheet
The Reference Documents section allows you to receive CCDA documents from external sources and add them to a patient’s Facesheet without importing the information directly into the chart. Although you can add documents to the Reference Documents when the section is not included on the Facesheet, it does make the process easier.
| 1. | Open the Chart menu and select User Settings Admin. |
| 2. | Select the Facesheet & History tab. |
| 3. | Scroll down to Facesheet Sections. |
| 4. | Select the Reference Documents check box. |
| 5. | Select Save. |
| 6. | On the Facesheet, select Customize Facesheet and select the Reference Documents check box to add this section. |
Configuring the Method by Which Your Organization Will Import CCDs
You must configure the method by which your organization will import CCDs. You can set this by following these steps:
| 1. | Open the System menu and select System Defaults. |
| 2. | Select the Chart Defaults tab. |
| 3. | Scroll down to the External Document Default Actions section and select the Action Admin link. |
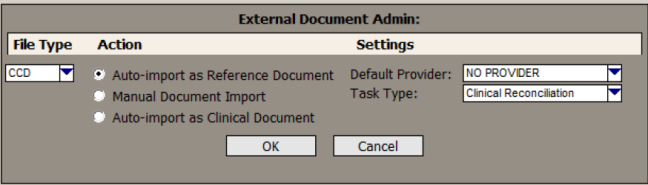
| 4. | Select CCD in the File Type list. |
| 5. | Select from the following radio buttons in the Action section: |
- Auto-import as Reference Document: Selecting this option imports all CCDs to the Reference Documents section of the Facesheet. This gives users the ability to electronically reconcile each CCD. Additionally, this setting prevents users from skipping reconciling and saving the CCD directly to the chart.
- Manual Document Import: Selecting this option allows users to either save CCDs to the Reference Documents section of the Facesheet or directly into the chart. This option should be selected if users should have the option of reconciling a CCD.
- Auto-import as Clinical Document: Selecting this option saves all CCDs directly into the patient’s chart. With this selection, there is no opportunity to electronically reconcile the information contained in the CCD.
The Auto-import as Clinical Document option will not qualify visits for this measure.
| 6. | Select OK to save your changes or select Cancel to return to the Chart Defaults tab without saving the changes. |
| 7. | Select Save on the Chart Defaults tab to save all the changes made. Alternatively, select Cancel to discard your changes. |
Receive and Reconcile Workflows
You can reconcile information that comes from the patient's electronic continuity of care documents (CCDA).
- You can manually reconcile data by reviewing a CCDA that is saved to the Reference Documents section of a patient’s chart. The provider must acknowledge the document prior to the manual reconciliation.
- You can automatically reconcile a CCDA by reviewing and importing the data in it to the patient’s chart.
For the manual reconciliation process, the visit must be linked to the patient's chart and the provider (logged onto Prime Suite as himself or herself) must be the user that selects the Acknowledge button on the Reference Document. With the visit still linked, the Clinical Reconciliation boxes must be checked in the note.
See the following sections for step-by-step instructions on receiving and reconciling CCDAs:
Acknowledging a Summary of Care Document
Before manually reconciling, the summary of care document must be acknowledged to indicate this document was used to perform the reconciliations. The provider must be the one to acknowledge the document while logged onto Prime Suite as himself or herself. During the acknowledgment process, they will also link the summary of care document to the visit associated with the transition of care.
To acknowledge the summary of care document:
| 1. | Select the visit associated with the transition of care in the top left of Prime Suite. |
| 2. | Select the imported document in the Reference Document section of the patient’s Facesheet to open the document in the Reference Document Viewer. |

| 3. | Link the visit to the CCDA by following these steps: |
| a. | Select Select Visit to open the Visit Search window. The patient’s identification number is displayed in the Patient ID field. |
| b. | Select Search to find all of the patient's visits. |
| c. | Select the visit associated with the transition of care, and then select OK to confirm that you want to associate the selected visit with the document. Prime Suite returns to the Reference Document Viewer. |
This must match the currently linked visit.
| 4. | Select Acknowledge. |
The provider logged into Prime Suite as himself or herself must be the one to select Acknowledge.
The next time you view the document in the Reference Document Viewer, the date and time the document was acknowledged is updated.
Manually Reconciling Data
You can manually reconcile Medication Allergies, Problems, and Medications using the History and Habits Wizard, the Medications List, or in a Note. Be aware of the following:
- Reconciling from the History and Habits Wizard or the Medications List must be done while linked to the visit that qualified for the denominator. Additionally, after reconciling the needed data, you must include the reconciled data in a Note.
-
When manually reconciling in a Note, Medications are reconciled in the Plan section. Problems are reconciled in the Assessment section, and Allergies are reconciled in the PFSH section. The note must be linked to the visit that qualified for the denominator.
Prior to starting the reconciliations, make sure that the visit associated with the transition of care is selected in the top left of Prime Suite.
See the following sections for step-by-step instructions on completing reconciliations:
- Manually Reconciling Allergies
- Manually Reconciling Problems
- Manually Reconciling Medications
- Including the Manually Reconciled Data in a Clinical Note
Manually Reconciling Allergies
| 1. | In the Allergy section of the History & Habits Wizard or the PSFH section of the Note, manually compare the patient’s data from the Summary of Care to the data in Prime Suite and update Prime Suite, as necessary. |
| 2. | Document that you performed the reconciliation: |
- In the History & Habits Wizard, select the Allergies Reconciled check box in the Allergy section.
- In the PFSH section of a Note, select the Allergies Reconciled check box.
By selecting one of these check boxes, you are confirming that you have performed the reconciliation and confirming that you properly documented all information.
Manually Reconciling Problems
| 1. | In the Problems section of the History & Habits Wizard or the Assessment section of the Note, manually compare the patient’s data from the Summary of Care to the data in Prime Suite and update Prime Suite, as necessary. |
| 2. | Document that you performed the reconciliation: |
- In the History & Habits Wizard, select the Problems Reconciled check box in the Problems section.
- In the Assessment section of a Note, select the Problems Reconciled check box.
By selecting one of these check boxes, you are confirming that you have performed the reconciliation and confirming that you properly documented all information.
Manually Reconciling Medications
| 1. | In the Meds section of the History & Habits Wizard, the Medication List, or the Plan section of the Note, manually compare the patient’s data from the Summary of Care to the data in Prime Suite and update Prime Suite, as necessary. |
| 2. | Document that you performed the reconciliation: |
- In the History & Habits Wizard, select the Reconciled Medications check box in the Meds section.
- In the Medication List, select the Reconciled Medications check box.
- In the Plan section of a Note, select the Medications have been Reconciled check box.
While in the Plan section, make sure that the Inbound Transfer/Referral check box is selected.
By selecting one of these check boxes, you are confirming that you have performed the reconciliation and confirming that you properly documented all information.
If you used the History & Habits Wizard or Medication List to reconcile the data, you must also include the reconciled data in a clinical Note on the visit. If you don’t include this data in a Note, the reconciliations will not be properly recorded and will not qualify.
Including the Manually Reconciled Data in a Clinical Note
| 1. | After performing the medications, allergies, and problems reconciliations, create or edit the visit's Note. |
| 2. | Select and load the following sections in the Note: |
- Plan: To include the medication reconciliation.
- PFSH: To include the allergy reconciliation.
- Assessment: To include the problem reconciliation.
As you load each section, the corresponding reconciled information is pulled from the History & Habits Wizard or the Facesheet into the Note. As long as you selected the reconciled check boxes, the Medications have been Reconciled, Allergies Reconciled, and Problems Reconciled check boxes are automatically selected.
While in the Plan section, make sure that the Inbound Transfer/Referral check box is selected.
| 3. | Verify that the check boxes are selected and save the Note. |
Automatically Reconciling a CCDA
When there is a CCDA in the Reference Documents section of a patient’s chart, you can import data from the CCDA to automatically reconcile it to the patient's chart. When automatically reconciling, the medication, allergy, and problem data is added into the patient’s chart and marked as reconciled at the same time.
You must select at least one item under Demographics, before launching the Import.
Additionally, users must have the Reconcile Reference Documents user right assigned (System > User Rights > System Module > Reference Documents > Reconcile Reference Documents) to automatically reconcile CCDAs.
To automatically reconcile a CCDA:
| 1. | Link the visit prior to doing the reconciliation. You should use the visit associated with the transition of care. |
| 2. | In the Reference Documents section of the patient's Facesheet, select the CCDA you want to reconcile to load it in the Reference Document Viewer. |

Verify that the VisitID number in the Reference Document Viewer matches the Visit ID number in the Global Visit buffer before Reconciliation/Incorporation.
| 3. | Link the visit to the CCDA before starting the reconciliation: |
| a. | Select Select Visit to open the Visit Search window. The patient’s identification number is displayed in the Patient ID field. |
| b. | Select Search to find all of the patient's visits. |
| c. | Select the visit associated with the transition of care, and then select OK to confirm that you want to associate the selected visit with the document and return to the Reference Document Viewer. |
This must match the currently linked visit.
| 4. | Select Reconcile to open the Clinical Reconciliation dialog box. This dialog box includes sections that allow you to compare content from the CCD with content from the patient’s chart. |

Data from the patient’s chart displays in the From Patient’s Chart Facesheet column on the left-hand side. Data from the CCD displays in the From Clinical Summary column on the right-hand side. If information from the CCD differs from the patient’s chart, the new information displays as a selectable hyperlink in red text.
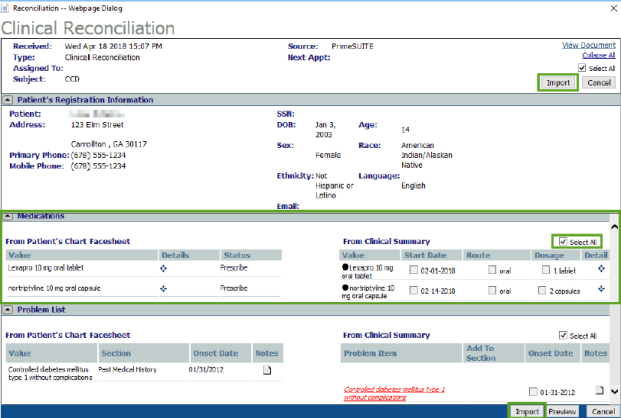
If you find the data from the CCD is already in the patient’s Facesheet, you can close the Clinical Reconciliation page and select Acknowledge at the bottom of the Reference Document Viewer.
| 5. | New patient information on the CCDA indicated by a red hyperlink must be mapped to an existing item on the patient's Facesheet or imported without mapping to be included in the patient's chart. Select the red hyperlink for a new item to open the Facesheet Section Search dialog box. |
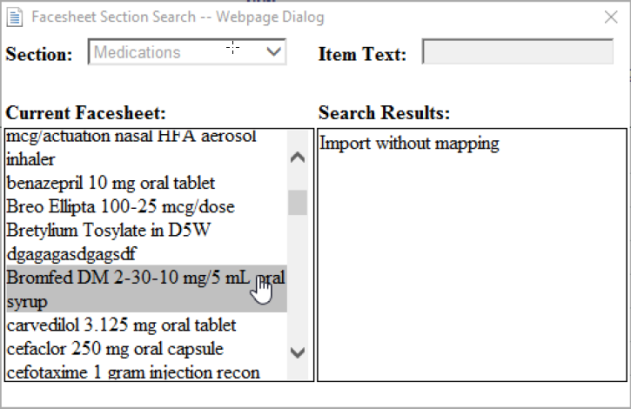
| 6. | Map the selected item from the CCD to an item on the Patient’s Facesheet by selecting an item in the Current Facesheet column. Alternatively, you can select Import without mapping in the Search Results column. |
| 7. | Repeat Steps 5-6 for any new items on the CCD indicated by a red hyperlink to either map the item or import the item to the patient’s Facesheet without mapping. |
| 8. | Use the check boxes in the From Clinical Summary pane of each section to select the data to import into the patient’s chart. To include all the information from the clinical summary in the patient’s chart, select the Select All check box. |
The Select All check box will not automatically import the new information for the patient in the CCDA indicated by red hyperlinks. You must select these and choose how to import this information.
| 9. | Select at least one item under Demographics in the Clinical Reconciliation window before selecting the Import button. If no demographic information needs to be updated, you must select the Select All check box in the Demographics section. |

If you do not update any demographic information or select the Select All check box, the referral will not qualify for the numerator.
| 10. | After selecting all of the desired information to import, select Import. |
The selected data is imported into the patient chart and the Medication List, Allergy List, and Problem List. This data will be marked as Reconciled in the database.
| 11. | Select OK to dismiss the success notification message once the import completes. |


